Disclaimer #
This tutorial is based on the graphical user interface of the Amazon AWS Console as it appears in December 2025 on a desktop computer. We strongly recommend completing the setup while seated at a computer, since the interface may differ on mobile phones or tablets.
Third-party platforms routinely update the layout and design of their control panels, and Amazon AWS is no exception. If you notice that the interface has changed or that the instructions and/or screenshots in this guide no longer match the current appearance of the AWS Console, please notify us so that we can update the documentation accordingly.
Some information on the screenshots used will be marked as “REDACTED” to protect the integrity of our own Amazon account. This will usually be the sensitive information that is different for you anyway.
Before We Start #
To use Elemental MediaConvert, you must have access to the Amazon AWS Console. Please note that Amazon services are not free, and you will incur charges when using them. All pricing and billing rates are determined solely by Amazon.
In this process, you will create a User, a Role, and a User Group, then configure the S3 Bucket and attach the necessary policies. Once the AWS components are in place, you will complete the setup by configuring PeepSo.
Finding IAM Service #
Amazon AWS Console can be confusing for the first time users so we will try to make this tutorial as simple as possible. Once you are logged in the first thing we want you to pay attention to is a search bar as indicated in the screenshot. This is where you can easily find the IAM Service by simply typing IAM into it.
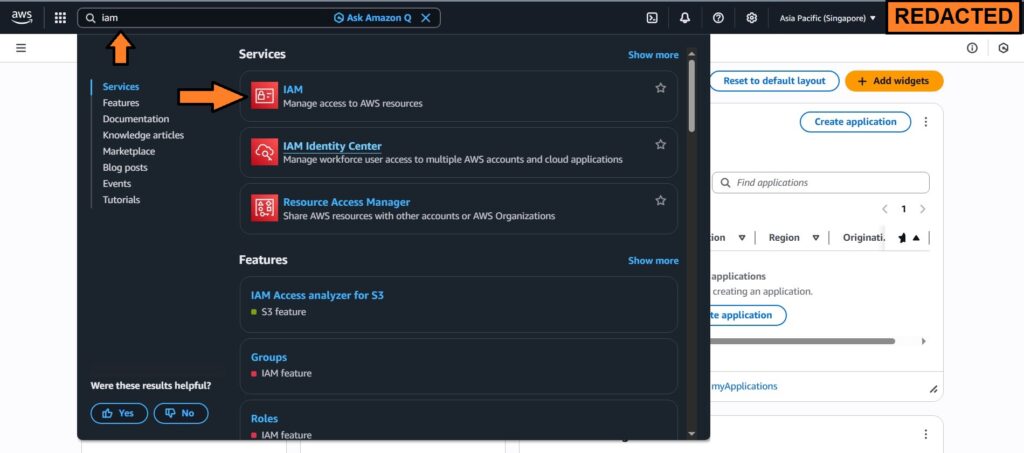
Click on it and lets get into the setup.
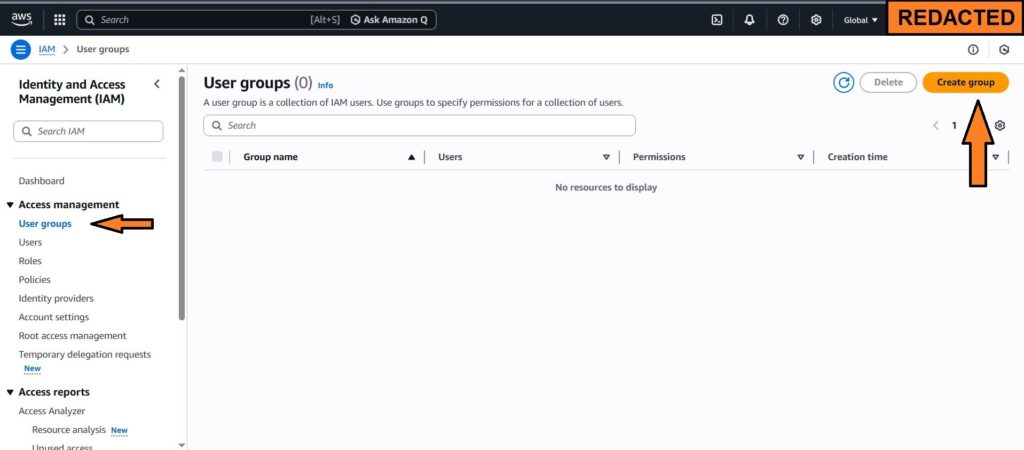
Creating The User Group #
In the IAM Services, from the left sidebar, under Access management, select User groups and then click on the Create group button
Give your User group a fancy name. We will simply call it, “MediaConvert” then scroll a bit down until you find the option to attach permission policies. There is almost 60 pages of policies here so it is easier if you search for them by copy/pasting following policies into the search field.
- AWSElementalMediaConvertFullAccess
- AmazonS3FullAccess
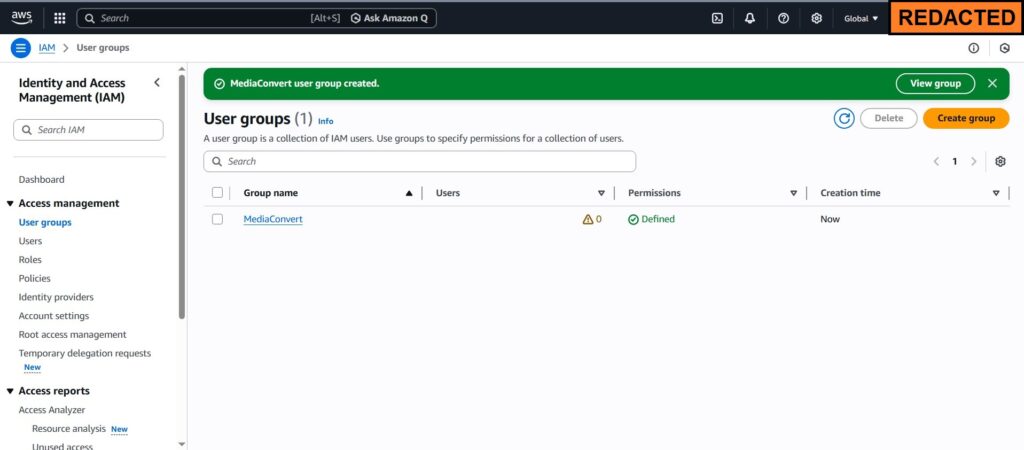
Once these two policies are attached to the group by simply checking the checkbox when you find it on the list, click on the “Create user group” button to finish the User group creation. You will get this as a result.
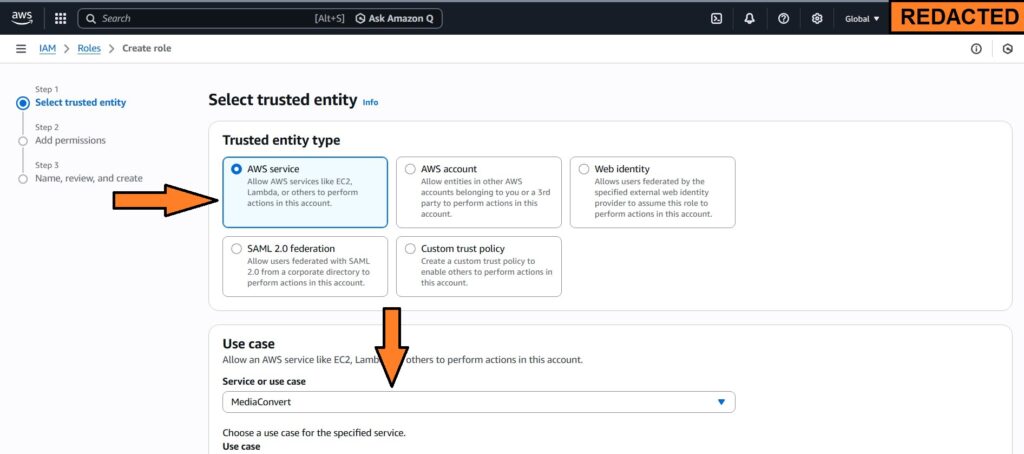
Creating A Role #
From the left sidebar, now select “Roles” and then click on the “Create Role” in the top-right area of the screen. The new area will open where you can set Trusted entity type and Use case. Select the following:
- Trusted entity type – AWS Service
- Use case – MediaConvert
Then click on Next at the bottom of the page to continue to the next step where you can review Permissions. There is no need to do anything on the Permissions page, just click on Next again.
Complete this task by adding the role name and then finishing with clicking on the “Create role” button. We named our role “MadiaConvert-role“, but you can use any fancy name if you wish. The end result will look like this;

Creating The User #
Finally we need to create the user, and to do that, in the left sidebar menu click on “Users” and then similarly to User group and the role, from the top-right corner click on the “Create user” button.
Give this new user a name, once again, for clarity, we will call this user “MediaConvert-user” but you can give it any fancy name, and then click on “Next“.
At this point, select “Add user to the group”, chose the group you created earlier and then click “Next“
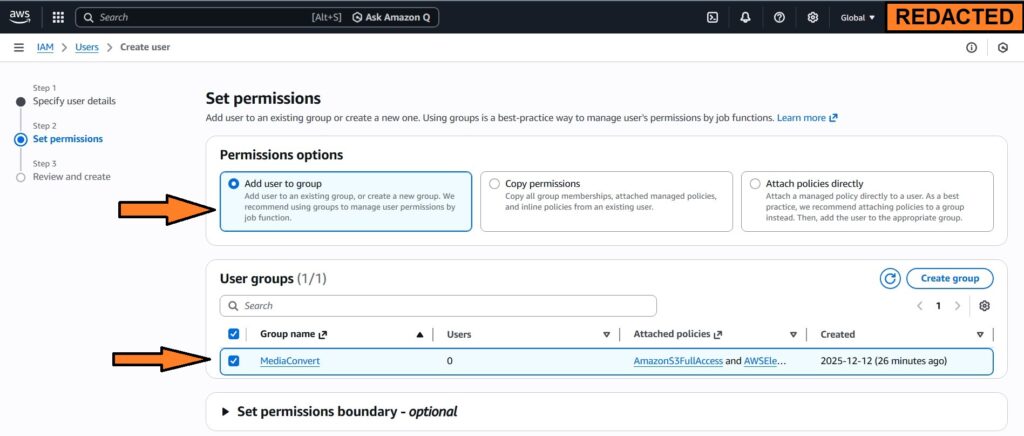
Finish it up by clicking on “Create User“. You will be looking at this screen now;

This marks the final step (for now) in IAM configuration. Next, we need to create and setup the S3 Bucket
Creating the S3 Bucket #
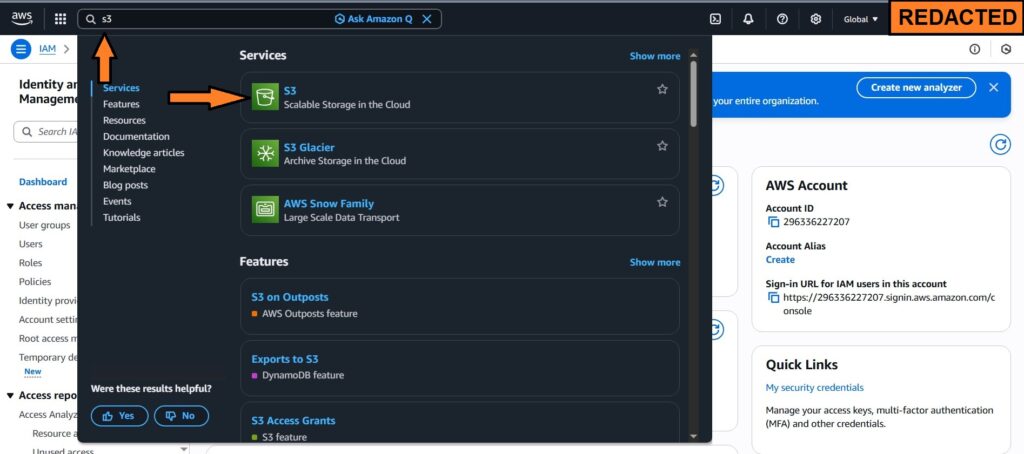
In the top search, type S3 and then click on the S3 link;
In the page that opens, click on the “Create bucket” button. The interface for creating the bucket will then load.
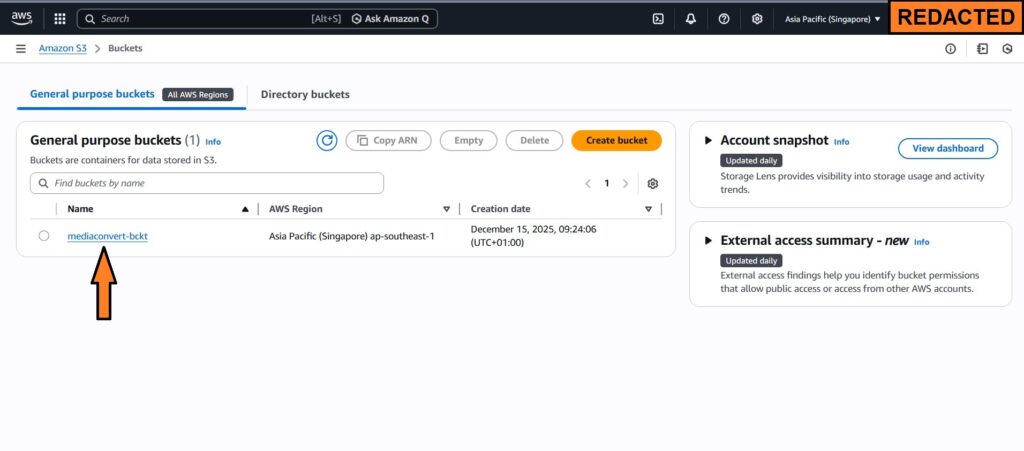
Chose “General purpose” for the bucket type and give your new bucket a DNS compliant name. We will use simply “mediaconvert-bckt“.
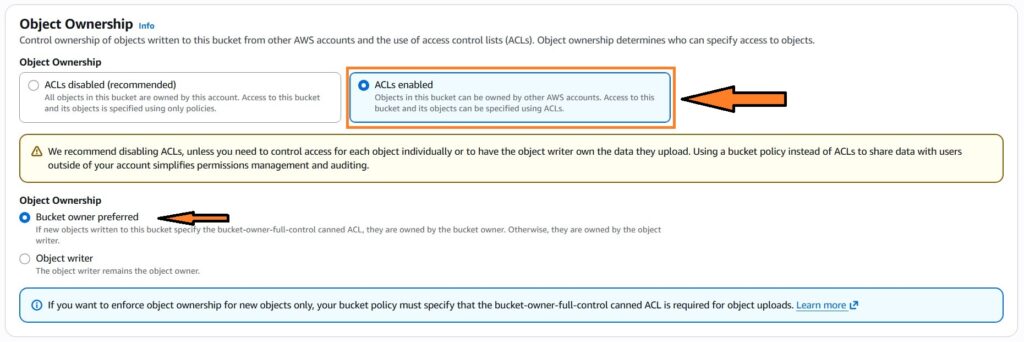
In the Object Ownership, select ACLs enabled and then chose the Bucket owner preferred for Object Ownership, as shown in the image bellow
Uncheck “Block all public access” – The integration can not work if it doesn’t have access.
Acknowledge that the current settings might result in this bucket and the objects within becoming public by checking the checkmark next to it.
Leave all other options as they are and then press “Create bucket” button. The bucket will then be created.
Attaching The Policy #
In the new browser window or tab, open the Amazon Policy Generator. This tool will allow you to generate the policy that you’ll attach to the bucket. You will need the following details:
- ARN of the user – You will find this by going back to IAM Service, and then editing the user we created previously.
- ARN of the S3 bucket – Similarly, you can find the S3 Bucket ARN within the bucket itself, in “Properties” tab
Enter the following data:
- In Step 1, “Type of policy” – Chose “S3 Bucket Policy“
- Following all refers to Step 2: Add statement(s)
- “Effect” – Allow
- “Principal” – Your user ARN
- “Actions” – Choose the following PutObject, PutObjectAcl, GetObject, GetObjectAcl, ListBucket
- “Amazon Resource Name (ARN)” – Enter the ARN of the bucket
- Finally, click on “Add Statement” and then in Step 3, “Generate Policy“
- Click on the “Copy Policy“
Now, go back to the bucket we just created, and click on it, then switch to “Permissions” tab. Edit the policy, so you can paste your policy that has just been generated and save changes.
Policy Error #
If you experience the error with the policy, go back to the bucket and create the folder “peepso” then try to generate the policy again. The policy should refer to the resource like this "Resource": [
"arn:aws:s3:::bucketname",
"arn:aws:s3:::bucketname/*"
]
NOTE: change the bucketname to the actual name of the bucket
Sample Policy #
Please take note on the following information
“arn:aws:iam::123456789101:user/user-name”,
“arn:aws:iam::123456789101:role/role-name”
as well as
“arn:aws:s3:::bucketname”,
“arn:aws:s3:::bucketname/*”
These are the dummy data in the sample policy that you need to change to your own values.
{
"Version": "2012-10-17",
"Statement": [
{
"Sid": "Statement1",
"Effect": "Allow",
"Principal": {
"AWS": [
"arn:aws:iam::123456789101:user/user-name",
"arn:aws:iam::123456789101:role/role-name"
]
},
"Action": [
"s3:PutObject",
"s3:PutObjectAcl",
"s3:GetObject",
"s3:GetObjectAcl",
"s3:ListBucket"
],
"Resource": [
"arn:aws:s3:::bucketname",
"arn:aws:s3:::bucketname/*"
]
}
]
}
Configuring PeepSo #
Finally the last step is to configure PeepSo. The entire configuration is done from WP Admin -> PeepSo -> Configuration -> Audio & Video (or just Video if you disabled Audio files)
First, enable video uploads, then chose Conversion With AWS Elemental MediaConvert
To get Amazon Access Key and Secret Access Key fields, go back to the user we created in IAM Service in AWS Console and click on “Create access key“
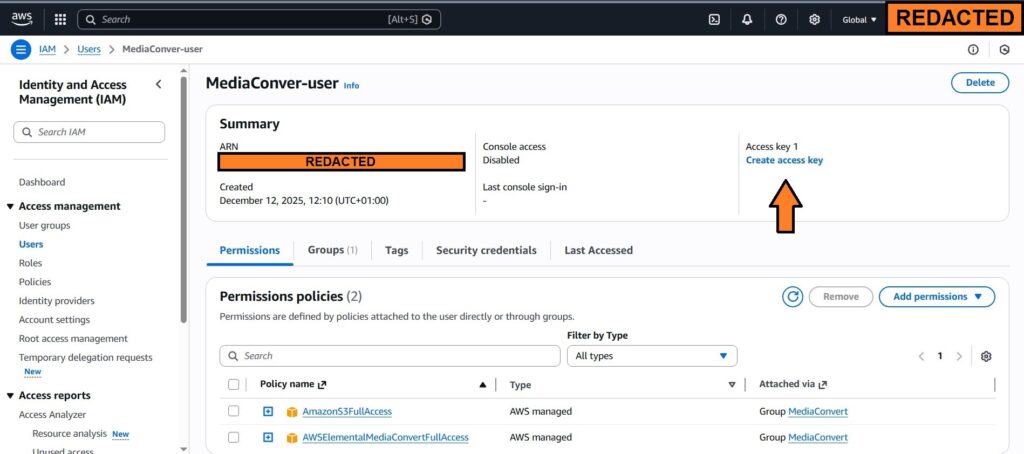
Choose “Third-party service” and click “Next“. Add the description for it and click “Create access key“
- Fill these two keys in appropriate fields within PeepSo configuration.
- For the AWS Region, select the same region where bucket is created.
- In the “Amazon S3 Bucket” field – Enter the name of the bucket
- “MediaConvert Role ARN” – Enter the ARN of the role created in IAM Service
Setting Up the Cron Job #
The last thing to do is to set up the cron job. But that is already covered in the separate document here: https://www.peepso.com/knowledgebase/cron/
You will need to run both cron jobs, first an amazon S3 cron job to initiate the video upload to AWS, and then a video convert cron job.
Basically, you’ll need both of these wget https://domain.com/?peepso_upload_videos_to_s3 > /dev/null
orcurl https://domain.com/?peepso_upload_videos_to_s3 > /dev/null
and
wget https://domain.com/?peepso_convert_videos_event > /dev/null
orcurl https://domain.com/?peepso_convert_videos_event > /dev/null


